

 HANDS ON SharePoint
 HANDS ON Teams
 HANDS ON Lists
 HANDS ON tek
 M365 Admin
Create Microsoft Lists and SharePoint custom forms without using Power Apps
List forms are generated automatically when a new list is created but sometimes it simply does not meet the business requirements and when that happens you need to create custom forms.
SharePoint list forms can be customized since forever and if you know the platform for a log time, things like InfoPath and Power Apps might sound familiar to you as these were the tools used to build custom forms.

With the new Microsoft Lists you can now create your own custom forms without leaving the application, using what is provided out of the box.
The customization options in the form allow you to configure the header, footer and the body using a custom JSON schema.
How to format the header and footer in a list form
The header and footer of a list form can be customized using JSON with HTML elements that will allow you to build complex HTML structures that are used to render information that is stored already in your list.
To format the header and footer of a list form you must do the following:
- Open a list form, you can do it from the new form or the item detail form
- Click in the edit form button
- From the menu click in Configure layout
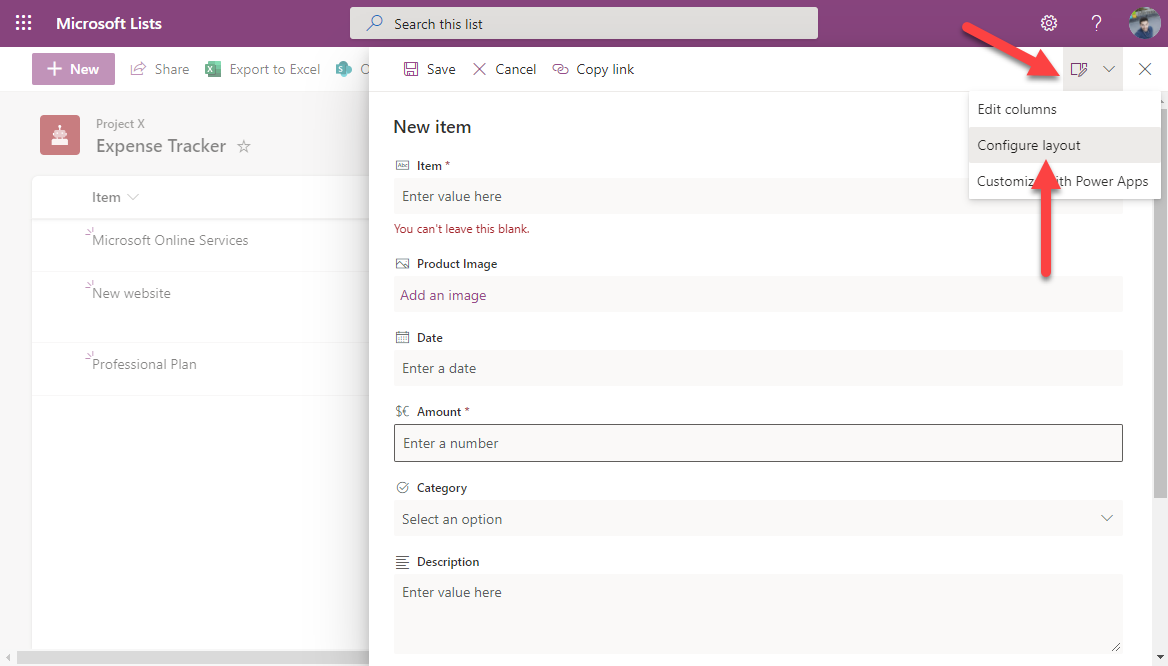
- In the Apply formatting to drop down, select Header or Footer
- Type the JSON formatting in the text box
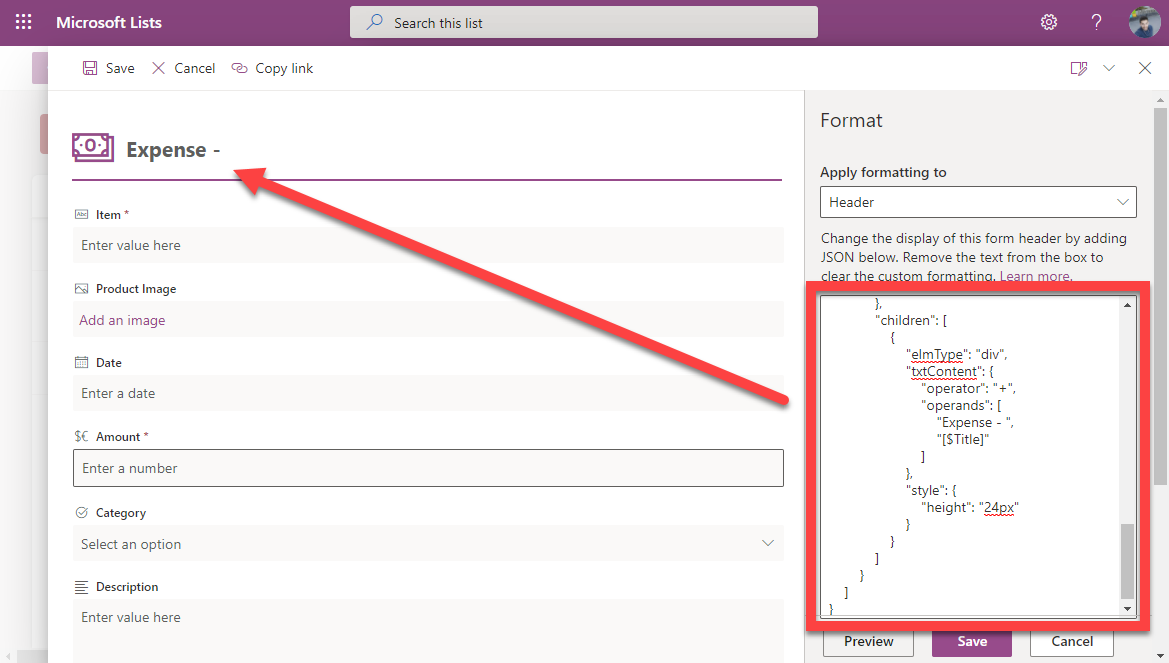
I’m providing the following example so you can use it as a starting point; it creates an HTML structure that displays the page title along with an icon and an underline matching the main color of the site{ "elmType": "div", "attributes": { "class": "ms-borderColor-themePrimary" }, "style": { "width": "99%", "border-top-width": "0px", "border-bottom-width": "2px", "border-left-width": "0px", "border-right-width": "0px", "border-style": "solid", "margin-bottom": "16px" }, "children": [ { "elmType": "div", "style": { "display": "flex", "box-sizing": "border-box", "align-items": "center" }, "children": [ { "elmType": "div", "attributes": { "iconName": "Money", "class": "ms-fontSize-su ms-fontWeight-regular ms-fontColor-themePrimary" }, "style": { "flex": "none", "padding": "0px", "padding-left": "0px", "height": "36px" } } ] }, { "elmType": "div", "attributes": { "class": "ms-fontColor-neutralSecondary ms-fontWeight-bold ms-fontSize-xl" }, "style": { "box-sizing": "border-box", "width": "100%", "text-align": "left", "padding": "21px 12px", "overflow": "hidden" }, "children": [ { "elmType": "div", "txtContent": { "operator": "+", "operands": [ "Expense - ", "[$Title]" ] }, "style": { "height": "24px" } } ] } ] } - Click on Preview to see the formatting applied
- Click on Save to make the new formatting available to all the users
How to format the body in a list form
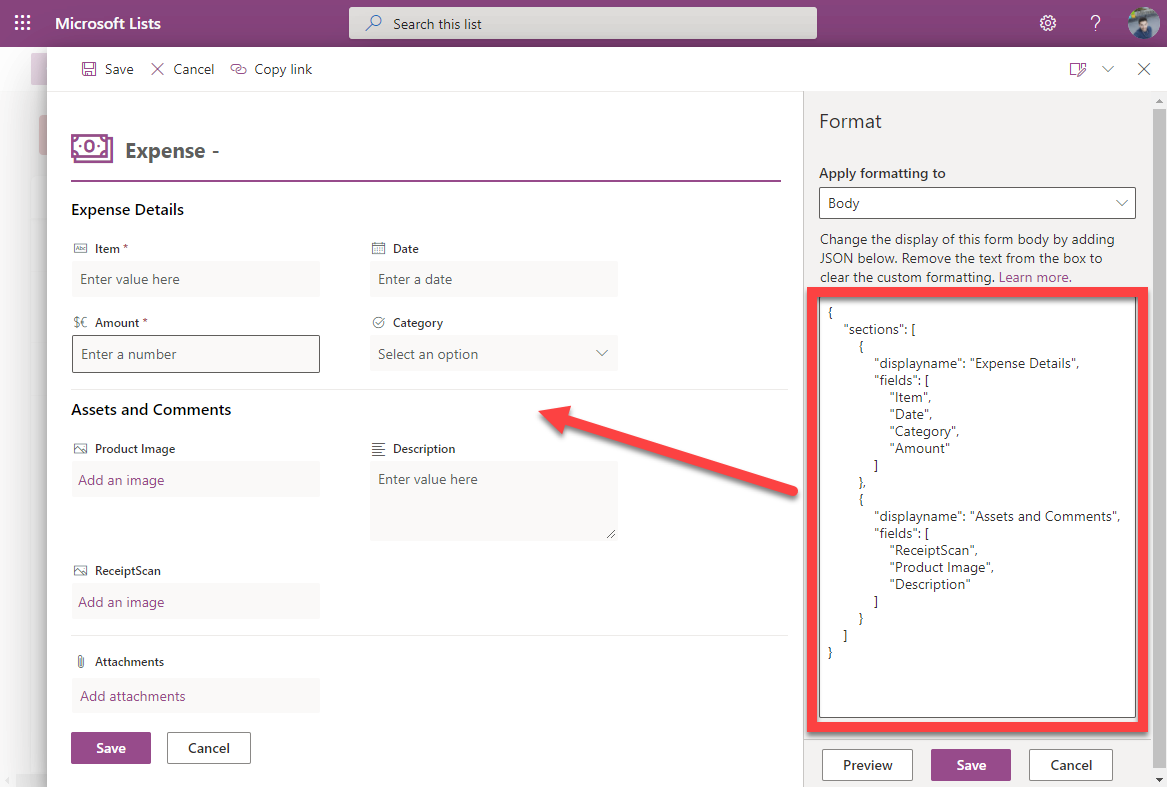
The body formatting in a list form allows you to create groups where the columns are displayed side by side, saving screen space and giving you a holistic view over the list item.
The body formatting despite being done with JSON uses a different schema and does not support the use of HTML.
To format the header and footer of a list form you must do the following:
- Open a list form, you can do it from the new form or the item detail form
- Click in the edit form button
- From the menu click in Configure layout
- In the Apply formatting to drop down, select Body
- Type the JSON formatting in the text box
I’m providing the following generic example so you can use it as a starting point; The JSON structure is quite simple and you just need to know the following properties:- fields – The display name of the column
- displayname – The string that will be displayed as the title of the group
{ "sections":[ { "displayname":"Section 1", "fields":[ "fieldName", "fieldName1" ] }, { "displayname":"Section 2", "fields":[ "fieldName2", "fieldName3" ] } ] } - Click on Preview to see the formatting applied
- Click on Save to make the new formatting available to all the users
Important rules about the body formatting that you should keep in mind:
- Columns are organized disregarding the definition order inside the section
- Columns cannot be repeated in multiple groups
- Pre-existing column formatting defined for the list are kept inside the body format
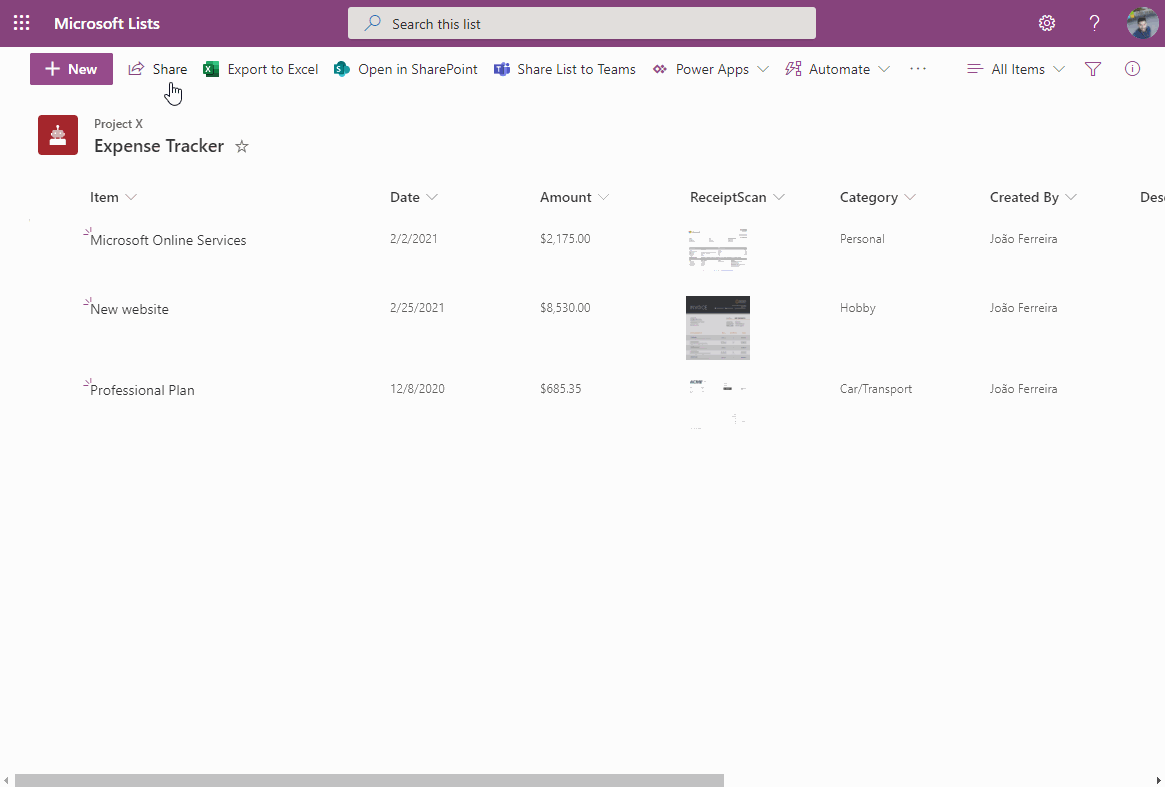
The customizations made to the list form will be visible in the new item form and in the item detail form and you will end up with a form similar to the following animation.
Now its time for you to get creative and surprise your users with amazing list forms built inside the lists platform.


January 26, 2021
Hello,
You can make show / hide based on a condition like in power apps ?
Best regards,
January 26, 2021
Unfortunately you cannot, hope Microsoft brings it to Lists later on. Have a nice day 🙂
January 29, 2021
Hi João,
Thank you for your post it’s quite helpful. Though I’m running into a problem while configuring the header, I’m not able to get data from read-only fields. Is it a system limitation?
Thank you
January 29, 2021
Hi Frederico,
I haven’t tested it with readonly fields yet but I’ll have a look.
Have a nice day 🙂
March 11, 2023
{
“sections”: [
{
“displayname”: “AAAA”,
“fields”: [
“Title”
]
},
{
“displayname”: “Details”,
“fields”: [
“Department”,
“Status”,
“Segment”
“Priority”
]
},
{
“displayname”: “Application”,
“fields”: [
“Cluster”,
“Reason”,
“Buyer”
]
}
]
}
But it show please enter the valid JSON
March 23, 2023
Hi Ashvin,
There is a comma missing in your JSON, whenever you face the same issue I suggest you to use the JSON parser online to validate the code.
Here you have the JSON fixed
{
   "sections":[
      {
         "displayname":"AAAA",
         "fields":[
            "Title"
         ]
      },
      {
         "displayname":"Details",
         "fields":[
            "Department",
            "Status",
            "Segment",
            "Priority"
         ]
      },
      {
         "displayname":"Application",
         "fields":[
            "Cluster",
            "Reason",
            "Buyer"
         ]
      }
   ]
}
Hope it helps, have a nice day.
June 14, 2023
Hi João,
Is there any way to populate the dropdown with a list of values from another list using this customization (without using powerapps) ?
Powerapps is good, but it doesn’t have the HTML editor and hence the above request. Any suggestion is much appreciated!
Thanks
February 9, 2024
Hi Naveen,
Yes it is possible you need to use the Lookup column and then select the list that will the source for your dropdown.
Have a nice day 🙂
October 25, 2023
Hi there,
Can someone give me a hint as to how to change the icon in your example?
For example with a Document image, Folder or piece of paper.
You help would be greatly appreciated.
October 25, 2023
I think I found a solution
https://www.youtube.com/watch?v=xPC6nY2UbfA
https://developer.microsoft.com/en-us/fluentui#/styles/web/icons
February 9, 2024
Thanks for sharing the resources.
Have a nice day 🙂