

 HANDS ON SharePoint
 HANDS ON Teams
 HANDS ON Lists
 HANDS ON tek
 M365 Admin
How to group and sort a Microsoft Lists view by month
Microsoft Lists is a powerful tool that allows you to create and manage data in various ways. You can use lists to track issues, tasks, contacts, inventory, and more. One of the features that makes lists so versatile is the ability to create different views of your data. Views let you filter, sort, group, and format your list items according to your needs and preferences.
One common scenario that many users face is how to group their list items by month. For example, you might want to see how many tasks were completed, how many issues were resolved, or how much revenue was generated in each month. Grouping by month can help you identify trends, patterns, and outliers in your data.
In this blog post, I will guide you step by step through the process of creating a list view that is grouped and sorted by month in chronological order. You will learn how to create calculated columns, use formulas, and adjust sorting options to achieve the desired result.

Create a Month column using a calculated field
To replicate the solution I’ve implemented, you’ll need to create a calculated column that extracts the year from the Created column. To achieve this in your list, follow these steps:
- In your default list view click in the Add Column option
- Scroll down on the column types list and click on See all column types
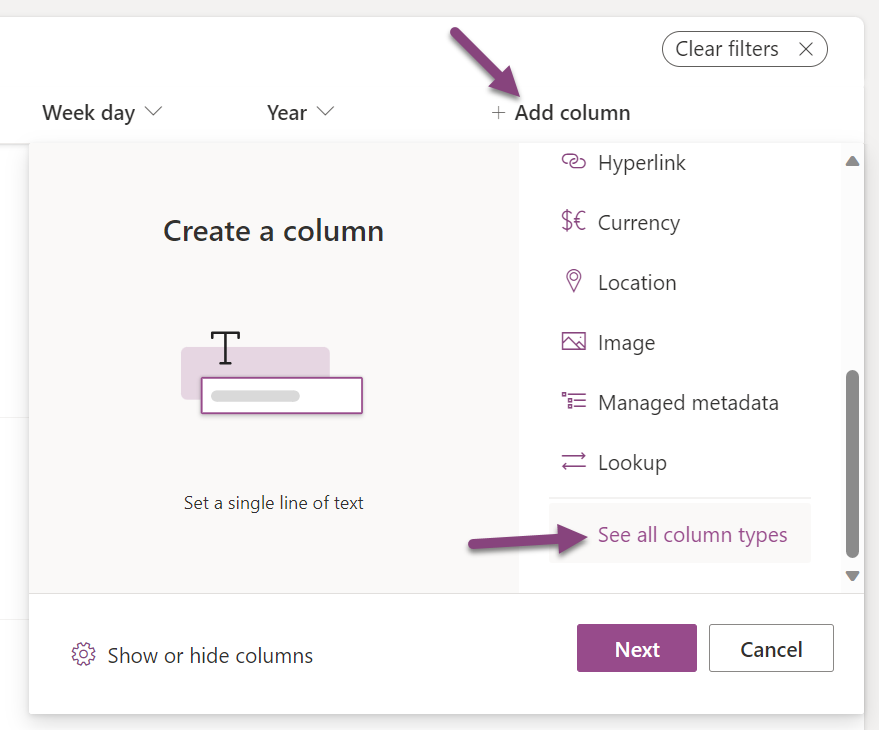
- Click Next, this action will redirect you to the classic SharePoint list settings page
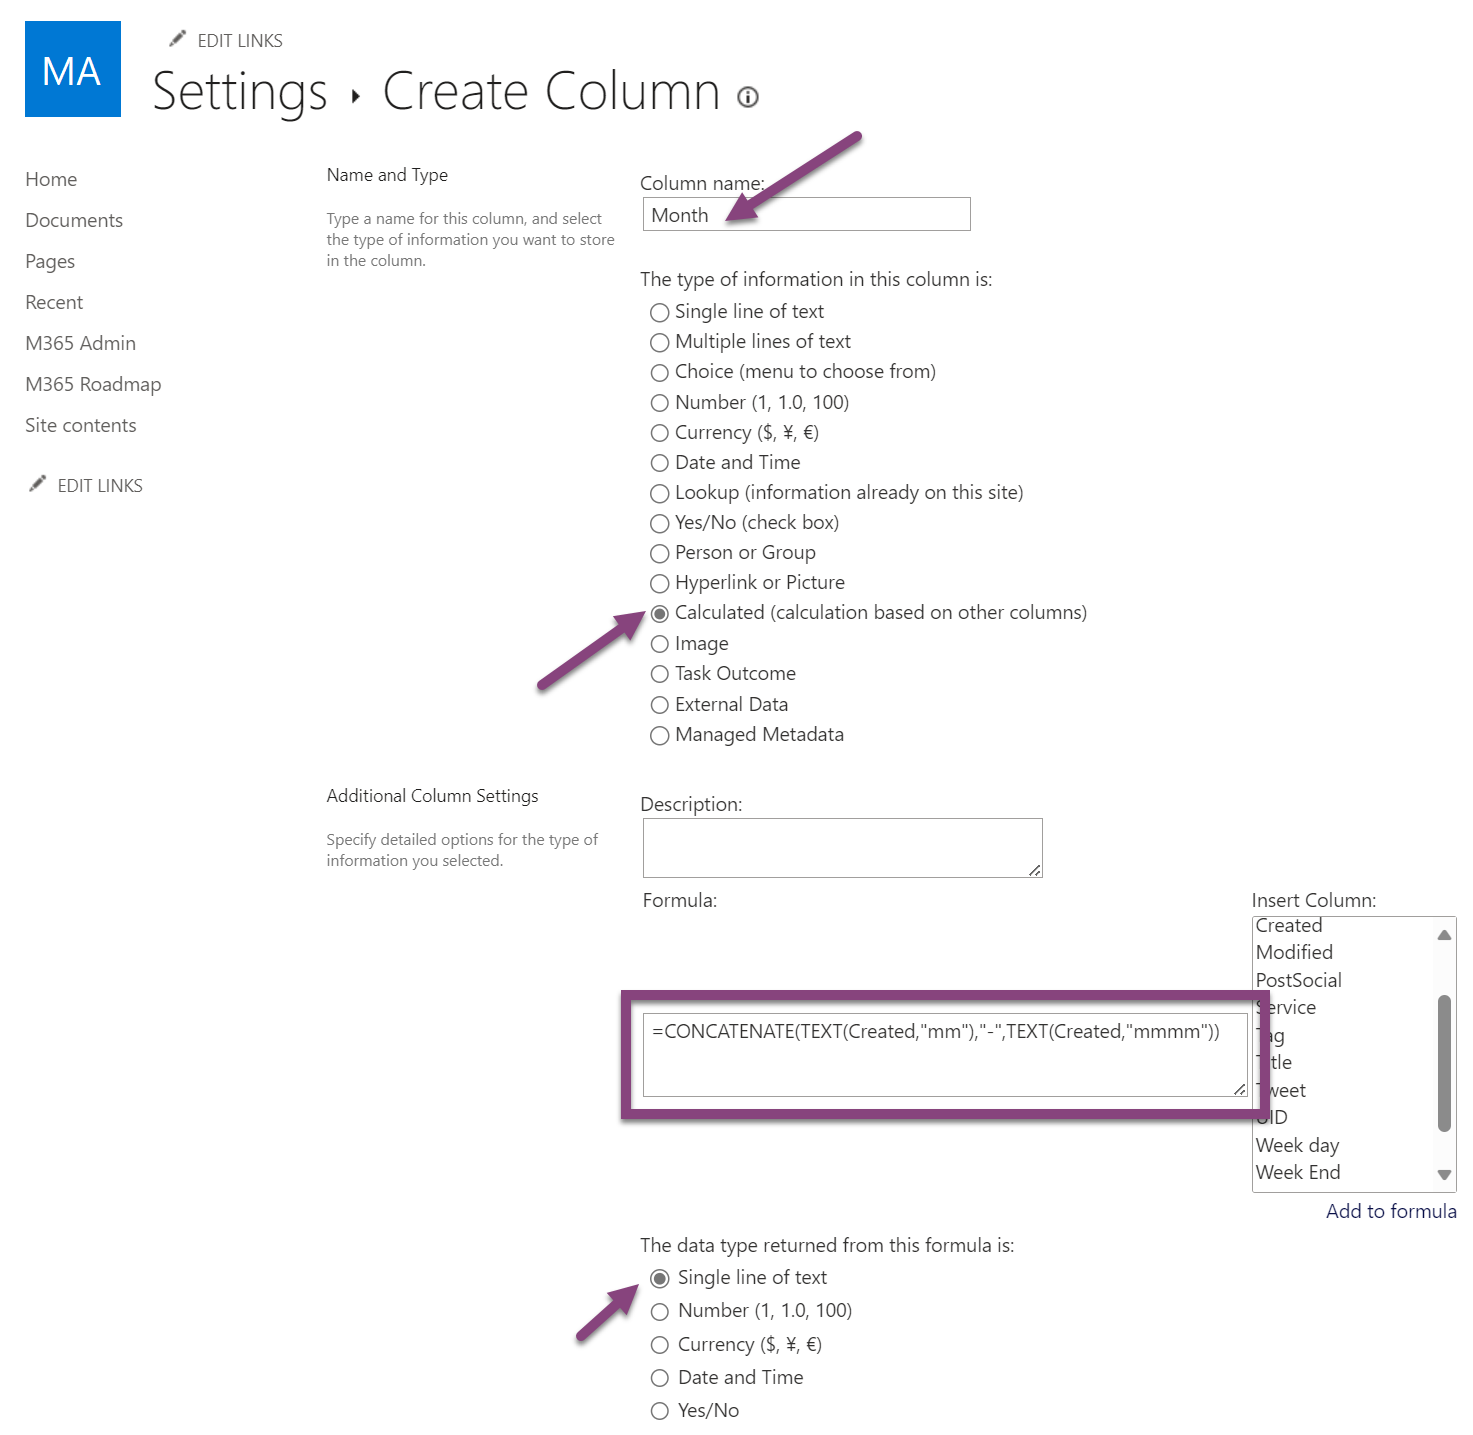
- Provide a name for your Month column
- Choose Calculated (calculation based on other columns) as the column type
- In the formula field type the following:
=CONCATENATE(TEXT(Created,"mm"),"-",TEXT(Created,"mmmm"))
This formula generates a string that combines the month’s numerical value with its name. The inclusion of the number preceding the month’s name is essential for enabling chronological sorting of the groups.
- Select single line of the text as the data type returned, and check the option to add the column to the view
- Click OK to save your new column, this action will redirect you back to the list and you will see the new column with the year in all list items
Group list items by month
Once the new column is added to the list, the subsequent step involves grouping the items by month. In this example, I’ve utilized the default Created column; however, should your list contain an alternative date column, you can seamlessly employ it for the same purpose without any complications.
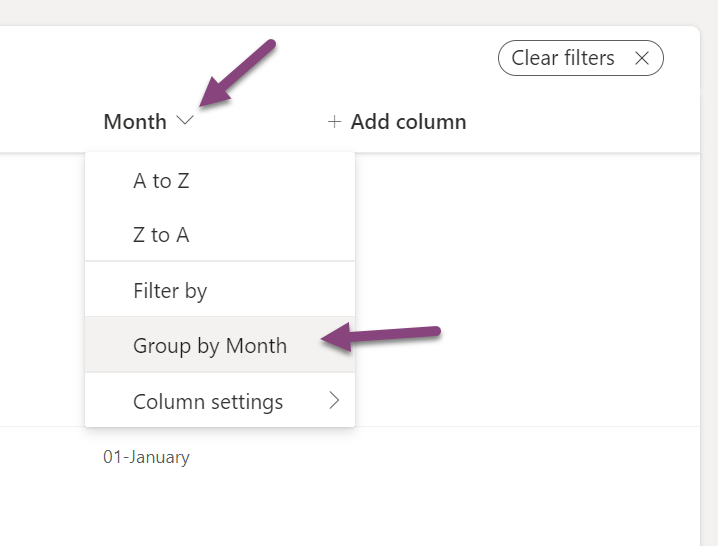
- On your view locate the Month column and click in the arrow next to it
- Select the option Group by
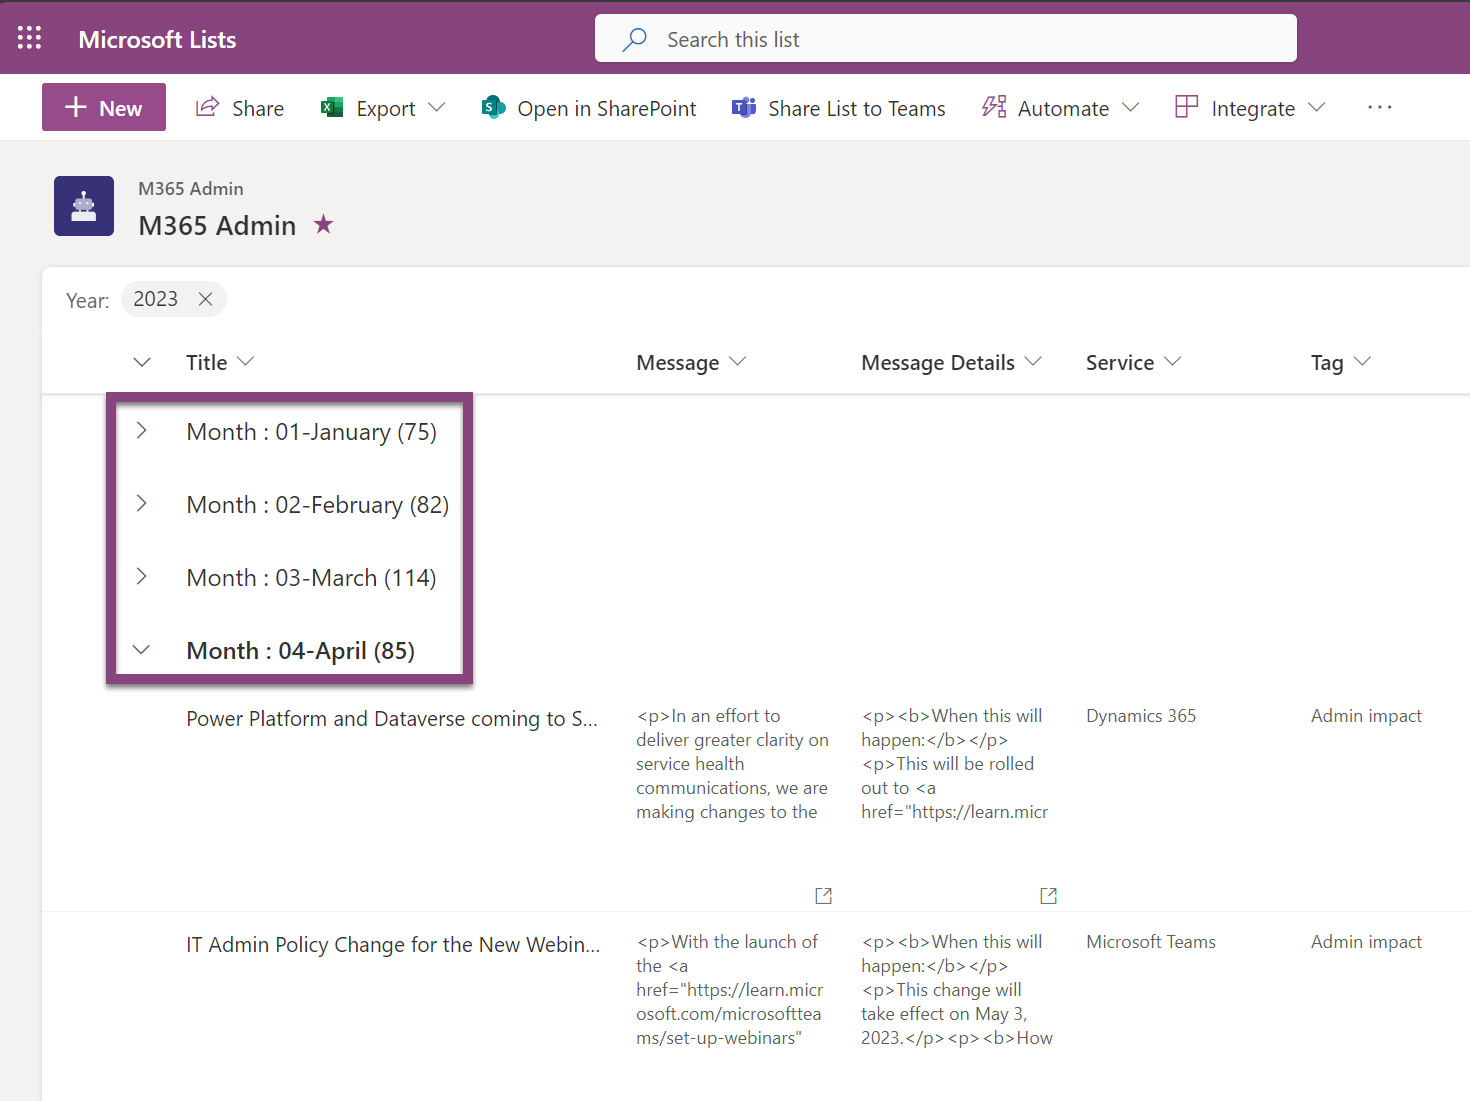
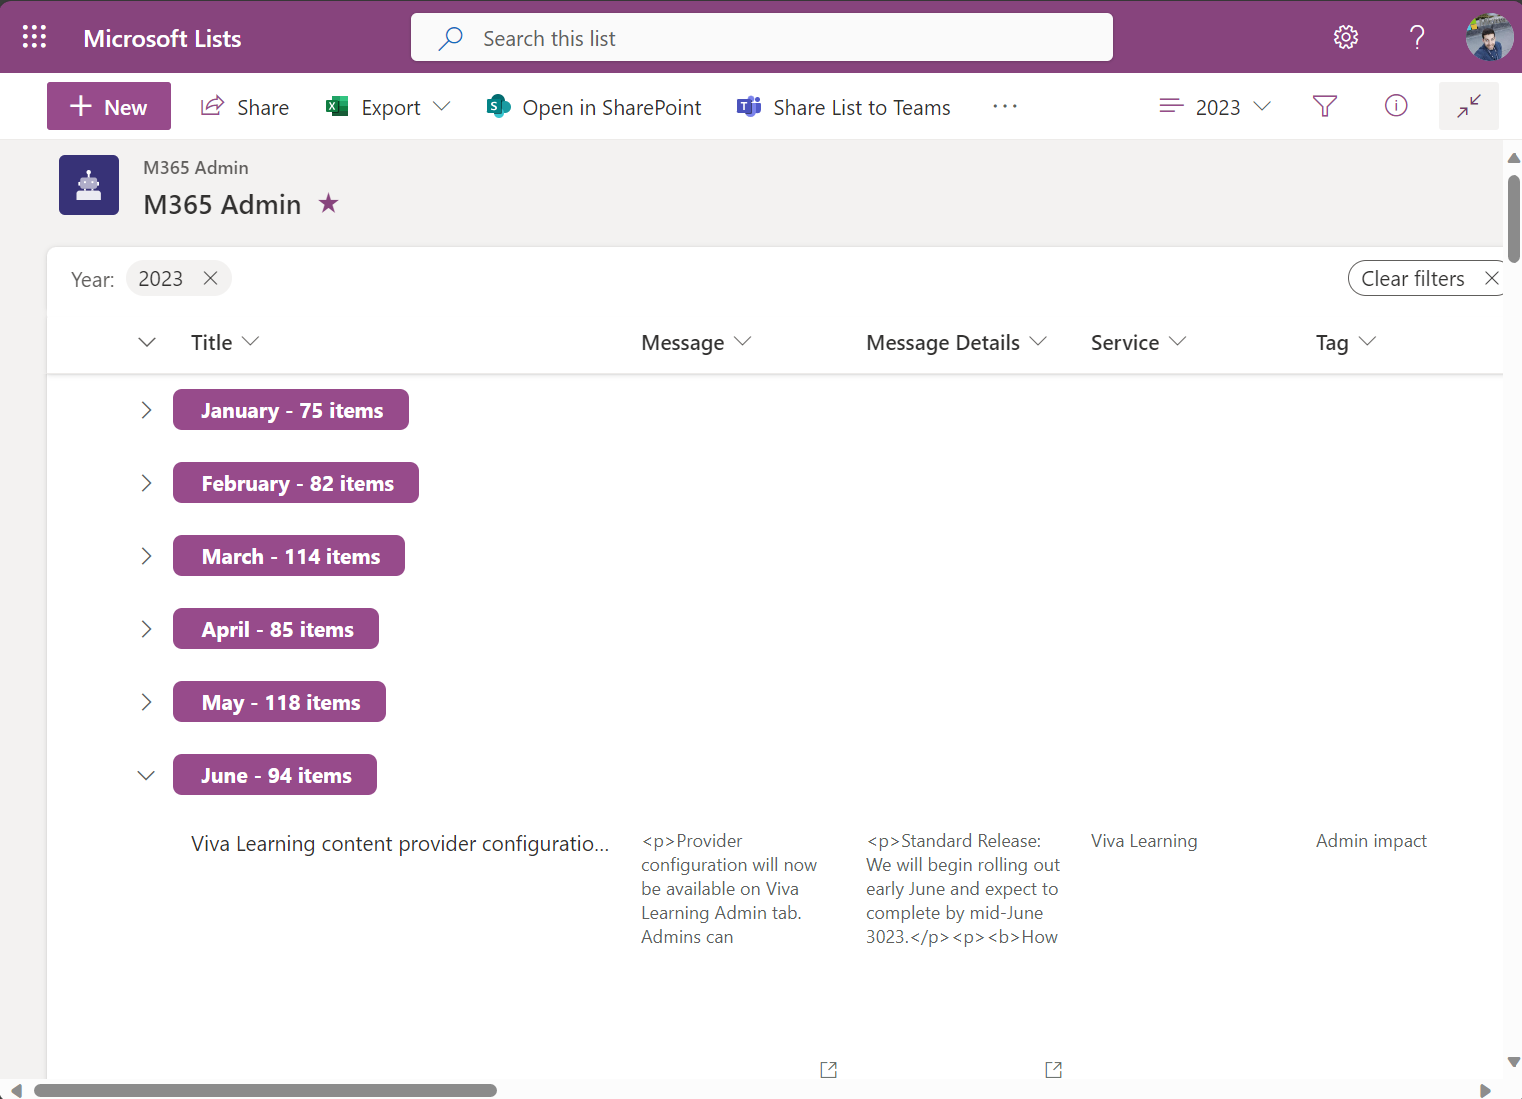
After grouping the items, each group will display the column name, followed by the month’s number, the month’s name, and the count of items within each group. Although this information is pertinent, it’s not presented in the most reader-friendly manner, so the next step will be to format the view to make it look better.
Format group headers to display the name of the month
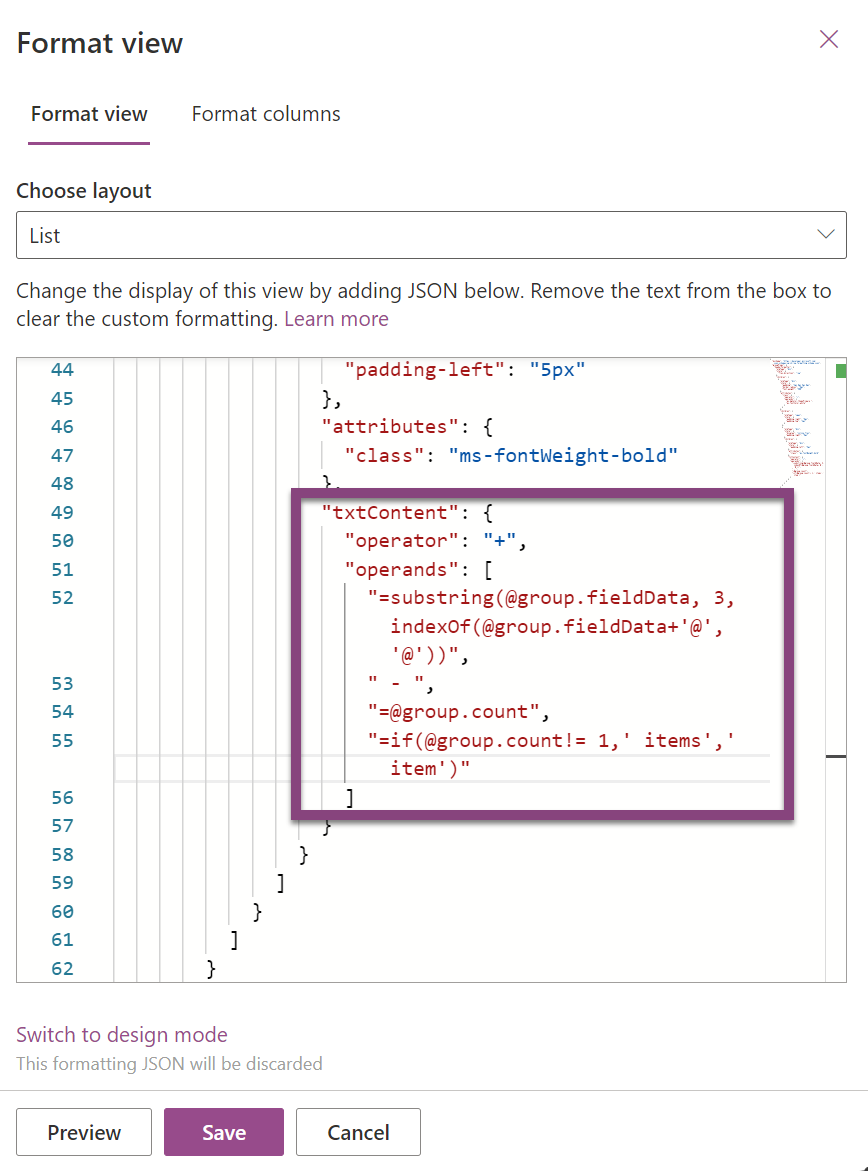
To present only the month’s name along with the item count for each group, you’ll need to apply view formatting with JSON. To accomplish this, please proceed with the following steps:
- Expand the view selector and then click on Format current view
- In the Format view window, click on the Advanced mode link to switch to the code editor mode
- Past the following code in the editor:
{
  "$schema": "https://developer.microsoft.com/json-schemas/sp/v2/row-formatting.schema.json",
  "groupProps": {
    "headerFormatter": {
      "elmType": "div",
      "style": {
        "flex-direction": "row"
      },
      "children": [
        {
          "elmType": "div",
          "style": {
            "padding": "4px 8px 5px 8px",
            "border-radius": "6px",
            "font-weight": "500"
          },
          "attributes": {
            "class": {
              "operator": "+",
              "operands": [
                "ms-bgColor-themePrimary ",
                "ms-fontColor-white"
              ]
            }
          },
          "children": [
            {
              "elmType": "span",
              "style": {
                "padding-right": "6px",
                "padding-top": "2px"
              }
            },
            {
              "elmType": "div",
              "style": {
                "display": "inline-flex",
                "padding-right": "9px"
              },
              "children": [
                {
                  "elmType": "div",
                  "style": {
                    "padding-left": "5px"
                  },
                  "attributes": {
                    "class": "ms-fontWeight-bold"
                  },
                  "txtContent": {
                    "operator": "+",
                    "operands": [
                      "=substring(@group.fieldData, 3, indexOf(@group.fieldData+'@','@'))",
                      " - ",
                      "=@group.count",
                      "=if(@group.count!= 1,' items',' item')"
                    ]
                  }
                }
              ]
            }
          ]
        }
      ]
    }
  }
}
There are several techniques in this sampele you can learn to format additional views. By examining the txtContent property in the JSON, you’ll discover how to concatenate a string using list formatting, split a string, and determine a string’s length with the indexOf function.
- Click Save to apply it, if everything went well you should see something like the image below
Conclusion
You have just learned how to create a simple but powerful list formatting solution that can group your data by month and sort it in chronological order. This technique can help you organize and visualize your information more effectively and efficiently. You can also apply the same logic to other fields and scenarios that require grouping and sorting by date. List formatting is a versatile and easy way to enhance your SharePoint lists and make them more user-friendly.


No comments yet