

 HANDS ON SharePoint
 HANDS ON Teams
 HANDS ON Lists
 HANDS ON tek
 M365 Admin
How to add custom list templates to Microsoft Lists
Microsoft Lists, an evolution of SharePoint lists was released with several predefined templates that can be used as a starting point when creating a new list. Despite including templates this new platform was missing the list template feature that was available in the classic world of SharePoint.
List templates in Microsoft Lists can only be created by the global administrator and the process is only available using PowerShell.

Before jumping into the template creation first you must create a list with the column definition and all the formatting that will be applied with the template.
In order to accomplish the steps described in this article you must get SharePoint Online management shell, if you don’t have it yet you can download it from here.
How to create a new Microsoft Lists template
- Start by opening the PowerShell console and execute the script below, alternatively you can download the script using the button available at the bottom of the article and execute it
Write-Host "Type URL to the list to be used as a template:" $listURL = Read-Host $tenenatName = $listURL.Split(".")[0].Split("//")[2] Write-Host "Type a title for the template:" $templateName = Read-Host Write-Host "Type a description for the template:" $templateDescription = Read-Host Write-Host "Select an icon for the list template (1-12):" Write-Host "1 - Bug" Write-Host "2 - Calendar" Write-Host "3 - Target" Write-Host "4 - List" Write-Host "5 - Airplane" Write-Host "6 - Rocket" Write-Host "7 - Color" Write-Host "8 - Insights" Write-Host "9 - Cube" Write-Host "10 - Test beaker" Write-Host "11 - Robot" Write-Host "12 - Savings" $templateIcon = Read-Host switch ($templateIcon) { 1 {$templateIconName = "Bug"; Break} 2 {$templateIconName = "Calendar"; Break} 3 {$templateIconName = "BullseyeTarget"; Break} 4 {$templateIconName = "ClipboardList"; Break} 5 {$templateIconName = "Airplane"; Break} 6 {$templateIconName = "Rocket"; Break} 7 {$templateIconName = "Color"; Break} 8 {$templateIconName = "Insights"; Break} 9 {$templateIconName = "CubeShape"; Break} 10 {$templateIconName = "TestBeakerSolid"; Break} 11 {$templateIconName = "Robot"; Break} 12 {$templateIconName = "Savings"; Break} default {$templateIconName = "BullseyeTarget"} } Write-Host "Select a color for the list template (1-12):" Write-Host "1 - Dark red" Write-Host "2 - Red" Write-Host "3 - Orange" Write-Host "4 - Green" Write-Host "5 - Dark green" Write-Host "6 - Teal" Write-Host "7 - Blue" Write-Host "8 - Navy blue" Write-Host "9 - Blue purple" Write-Host "10 - Dark blue" Write-Host "11 - Lavender" Write-Host "12 - Pink" $templateColor= Read-Host switch ($templateColor) { 1 {$templateColorName = "Dark red"; Break} 2 {$templateColorName = "Red"; Break} 3 {$templateColorName = "Orange"; Break} 4 {$templateColorName = "Green"; Break} 5 {$templateColorName = "Dark green"; Break} 6 {$templateColorName = "Teal"; Break} 7 {$templateColorName = "Blue"; Break} 8 {$templateColorName = "Navy blue"; Break} 9 {$templateColorName = "Blue purple"; Break} 10 {$templateColorName = "Dark blue"; Break} 11 {$templateColorName = "Lavender"; Break} 12 {$templateColorName = "Pink"; Break} default {$templateColorName = "Red"} } Write-Host "Type the url to the the thumbnail to be used by the template" $templateThumbnail = Read-Host Connect-SPOService -url ("https://{0}-admin.sharepoint.com" -f $tenenatName) $listTemplate = Get-SPOSiteScriptFromList -ListUrl $listURL $siteScript = Add-SPOSiteScript -Title $templateName -Description $templateDescription -Content $listTemplate Add-SPOListDesign -Title $templateName -Description $templateDescription -SiteScripts $siteScript.Id -ListColor $templateColorName -ListIcon $templateIconName -Thumbnail $templateThumbnail - Provide the URL to the list that will be used as a template
- Provide the name and description for the list template
- Select the template default icon and color to be used by the template from the 12 default values
- Provide the URL to be used as a thumbnail for the list, it is recommended to host the URL in SharePoint prior the template creation in a location accessible to all the users in the organization
- Authenticate using your credentials

The process takes only a few seconds and once completed your will see a message similar to what is displayed in the image above.
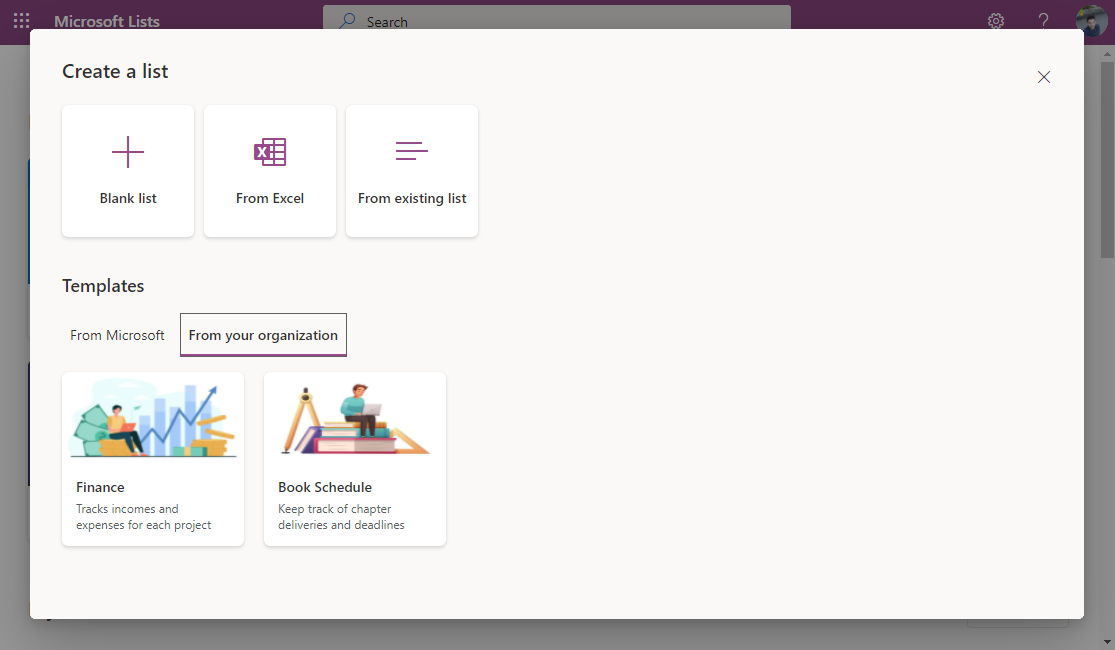
How to create a new list based on a custom template
The creation of lists using your new template is super simple, all you have to do is:
- On Microsoft Lists click on the New list button
- Click in the From your organization tab
- Select your newly created template from the list of available templates
- Click Use template
- Provide a name and a description for your new list and alternatively chance the default color and default icon
- Click Create and start using your list
If you want to see this method in action before executing it in your tenant have a look to the video I’ve recorder explaining and creating list templates.


November 1, 2023
Look great, short and simple, Thank you 🙂